Understanding Receipt Enquiry
📦 What is Receipt Enquiry?
Receipt Enquiry is a Canary7 feature that provides a centralised interface for accessing, managing, and tracking receipts. It enhances visibility and control over inbound goods, helping ensure a faster, more accurate, and streamlined receiving process.
🔑 Key Functions
🔍 View Receipt Details – Instantly access receipt numbers, supplier information, item quantities, and current statuses.
✏️ Edit Receipt Data – Make updates or corrections to maintain data integrity.
➕ Add New Receipts – Record inbound shipments either manually or via CSV upload.
📦 Track Receipts – Monitor the flow of receipts from creation through to check-in.
⚠️ Resolve Discrepancies – Easily identify and act on quantity variances or missing items.
🔁 Close & Split Receipts – Close off checked-in stock and generate a new receipt for open items (NEW – see below).
This feature is essential for ensuring an accurate and efficient goods-in process, reducing delays, and minimising manual errors.
🚪 Accessing Receipt Enquiry
Click the Navigation Menu (top-left corner).
Search for "Receipt Enquiry" and select it.
ORNavigate to: Inbound > Receipt Enquiry
✂️ Close and Split Receipts – NEW FUNCTIONALITY
🧠 What it Does:
The Close and Split function allows you to:
Close the receipt for any checked-in quantities
Split the remaining open lines into a new receipt, suffixed with
##1
This is ideal in high-throughput warehouses where speed is essential. It enables putaway jobs to be created and executed immediately for goods that are already checked in — without waiting for the full receipt to complete.
⚙️ How it Works:
From the Receipt Enquiry screen, select a receipt with partially checked-in items.
Click the Red Action Button > Close and Split
The system will:
Close off all fully checked-in lines
Automatically create a new receipt with the remaining open lines (e.g.,
PO123456##1)
🎯 Benefits:
Enables faster stock availability for putaway
Reduces warehouse bottlenecks
Improves receiving throughput
Allows parallel handling of partially received shipments
📄 Receipt Tab – General Receipt Information
Use this tab to view and filter receipt headers – representing each inbound shipment.

The Receipt Tab displays a list of inbound shipments and general receipt details. It shows ownership and quantity data for each receipt.
🔎 Searchable Fields:
Receipt ID Type
Expected Receipt Date (From / To)
Leading Status / Trailing Status
Company
Warehouse
Item Code
Once you have entered all the information, you need to find your results click on the search button to continue.
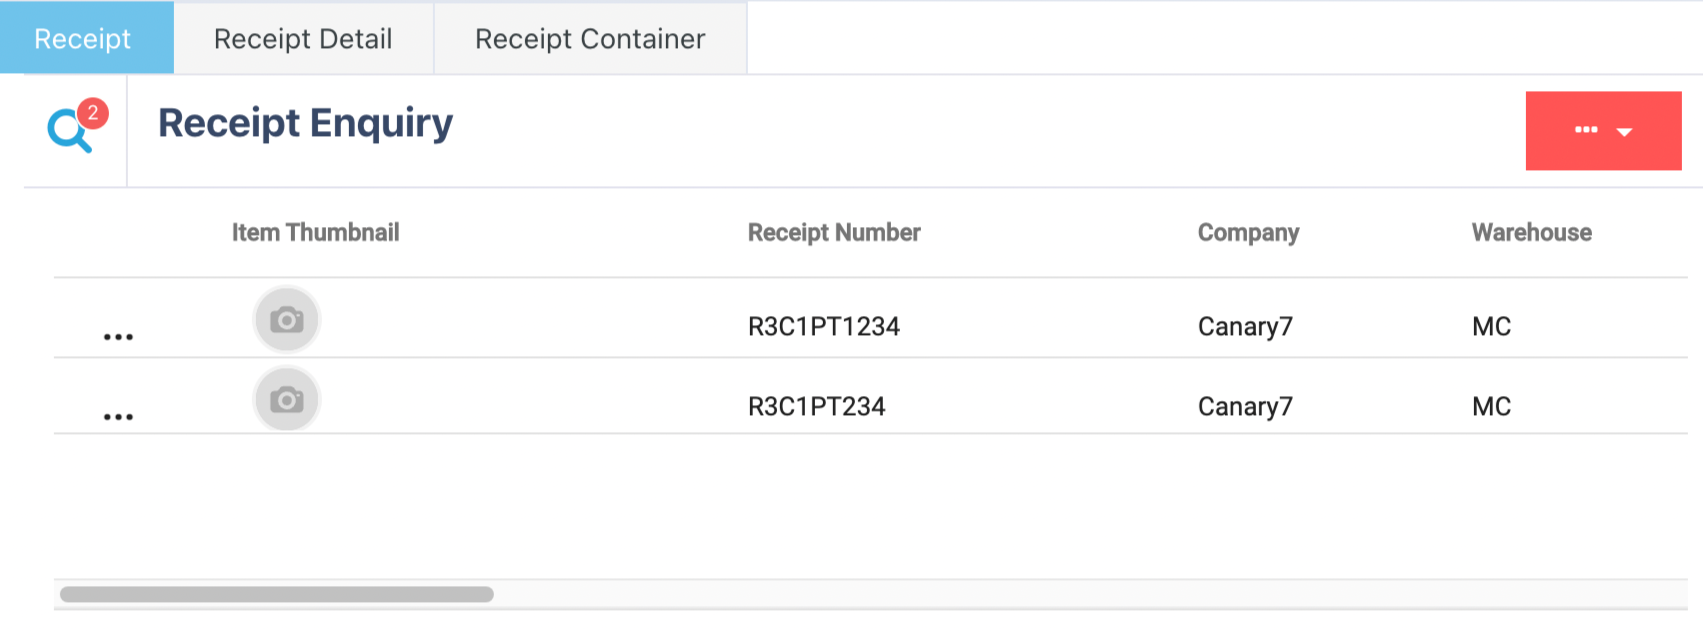
🧾 Column Headers:
Receipt Number
Company Code
Warehouse Code
Receipt Date
Source ID / Source Address / City / Zip
Country Name
Description
Trailing Status
Total Lines / Open Lines
Open Containers
If you want to refine your search, click on the search icon![]() and enter the fields required.
and enter the fields required.
📦 Receipt Detail Tab – Item-Level Information
Search here for detailed item-level records within each receipt..
.png "image(1).png")
🧠 Example Use Case:
Filter by Item Code to find all receipts containing a specific item.
🔎 Searchable Fields:
Item Description
Company
Quantity
Created From Date / To Date
Once you have selected and entered the required fields, click on the submit button.png) to add.
to add.
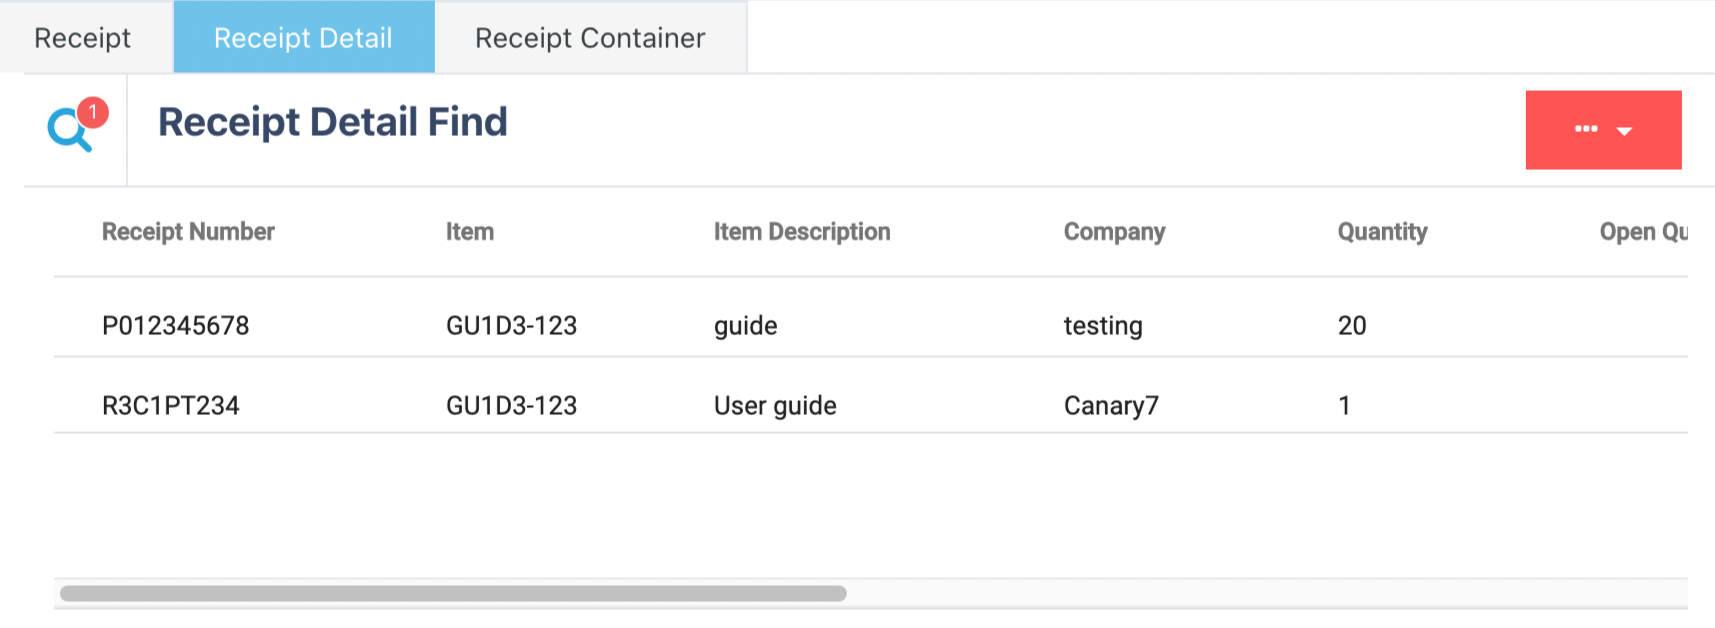
🧾 Column Headers:
Receipt Number
Item Code / Description
Company Code
Quantity / Open Quantity
Locating Rule
Receipt Date
Created At / Updated At
If you want to refine your search, click on the search icon![]() and enter the required fields.
and enter the required fields.
📥 Receipt Container Tab – Container-Level Info
This tab provides data related to containers associated with receipt items.
.png "image(2).png")
🧠 Example Use Case:
Find all containers related to a specific receipt.
🧾 Column Headers:
Container Number
Receipt Number
Item Code
Company Code
Quantity
Status
Location Code
Batch Number
Container Type
Created At / Updated At
Use the search icon to input or update your filters as needed.
➕ Adding Receipts
🗂️ Method 1: Import via CSV
CSV Format Must Include:
Header | Description |
|---|---|
Receipt Number | Unique ID for the receipt |
Source ID / Source Address | Supplier or origin |
Item Code | Item identifier |
Quantity | Number of units |
Country | Country of origin |
Locating Rule | e.g., Global Rule |
📄 Example:
PO1234789, CAN7, Canary7, GU1D3-123, 20, UK, Global RuleHere is the .csv template for Download
Importing the CSV
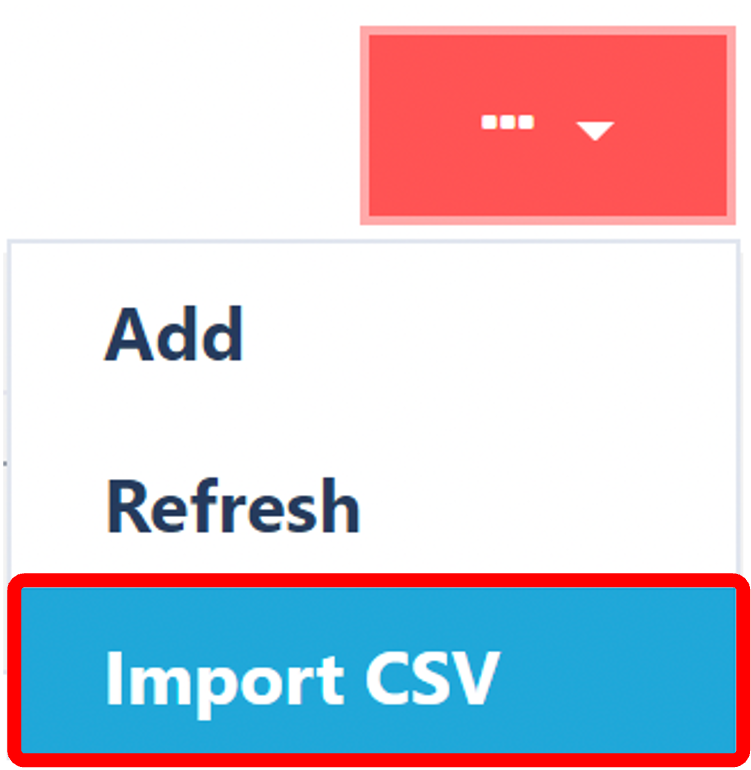
Within Receipt Enquiry, click on the Red Action Button  this will bring up a drop-down menu and select "Import CSV".
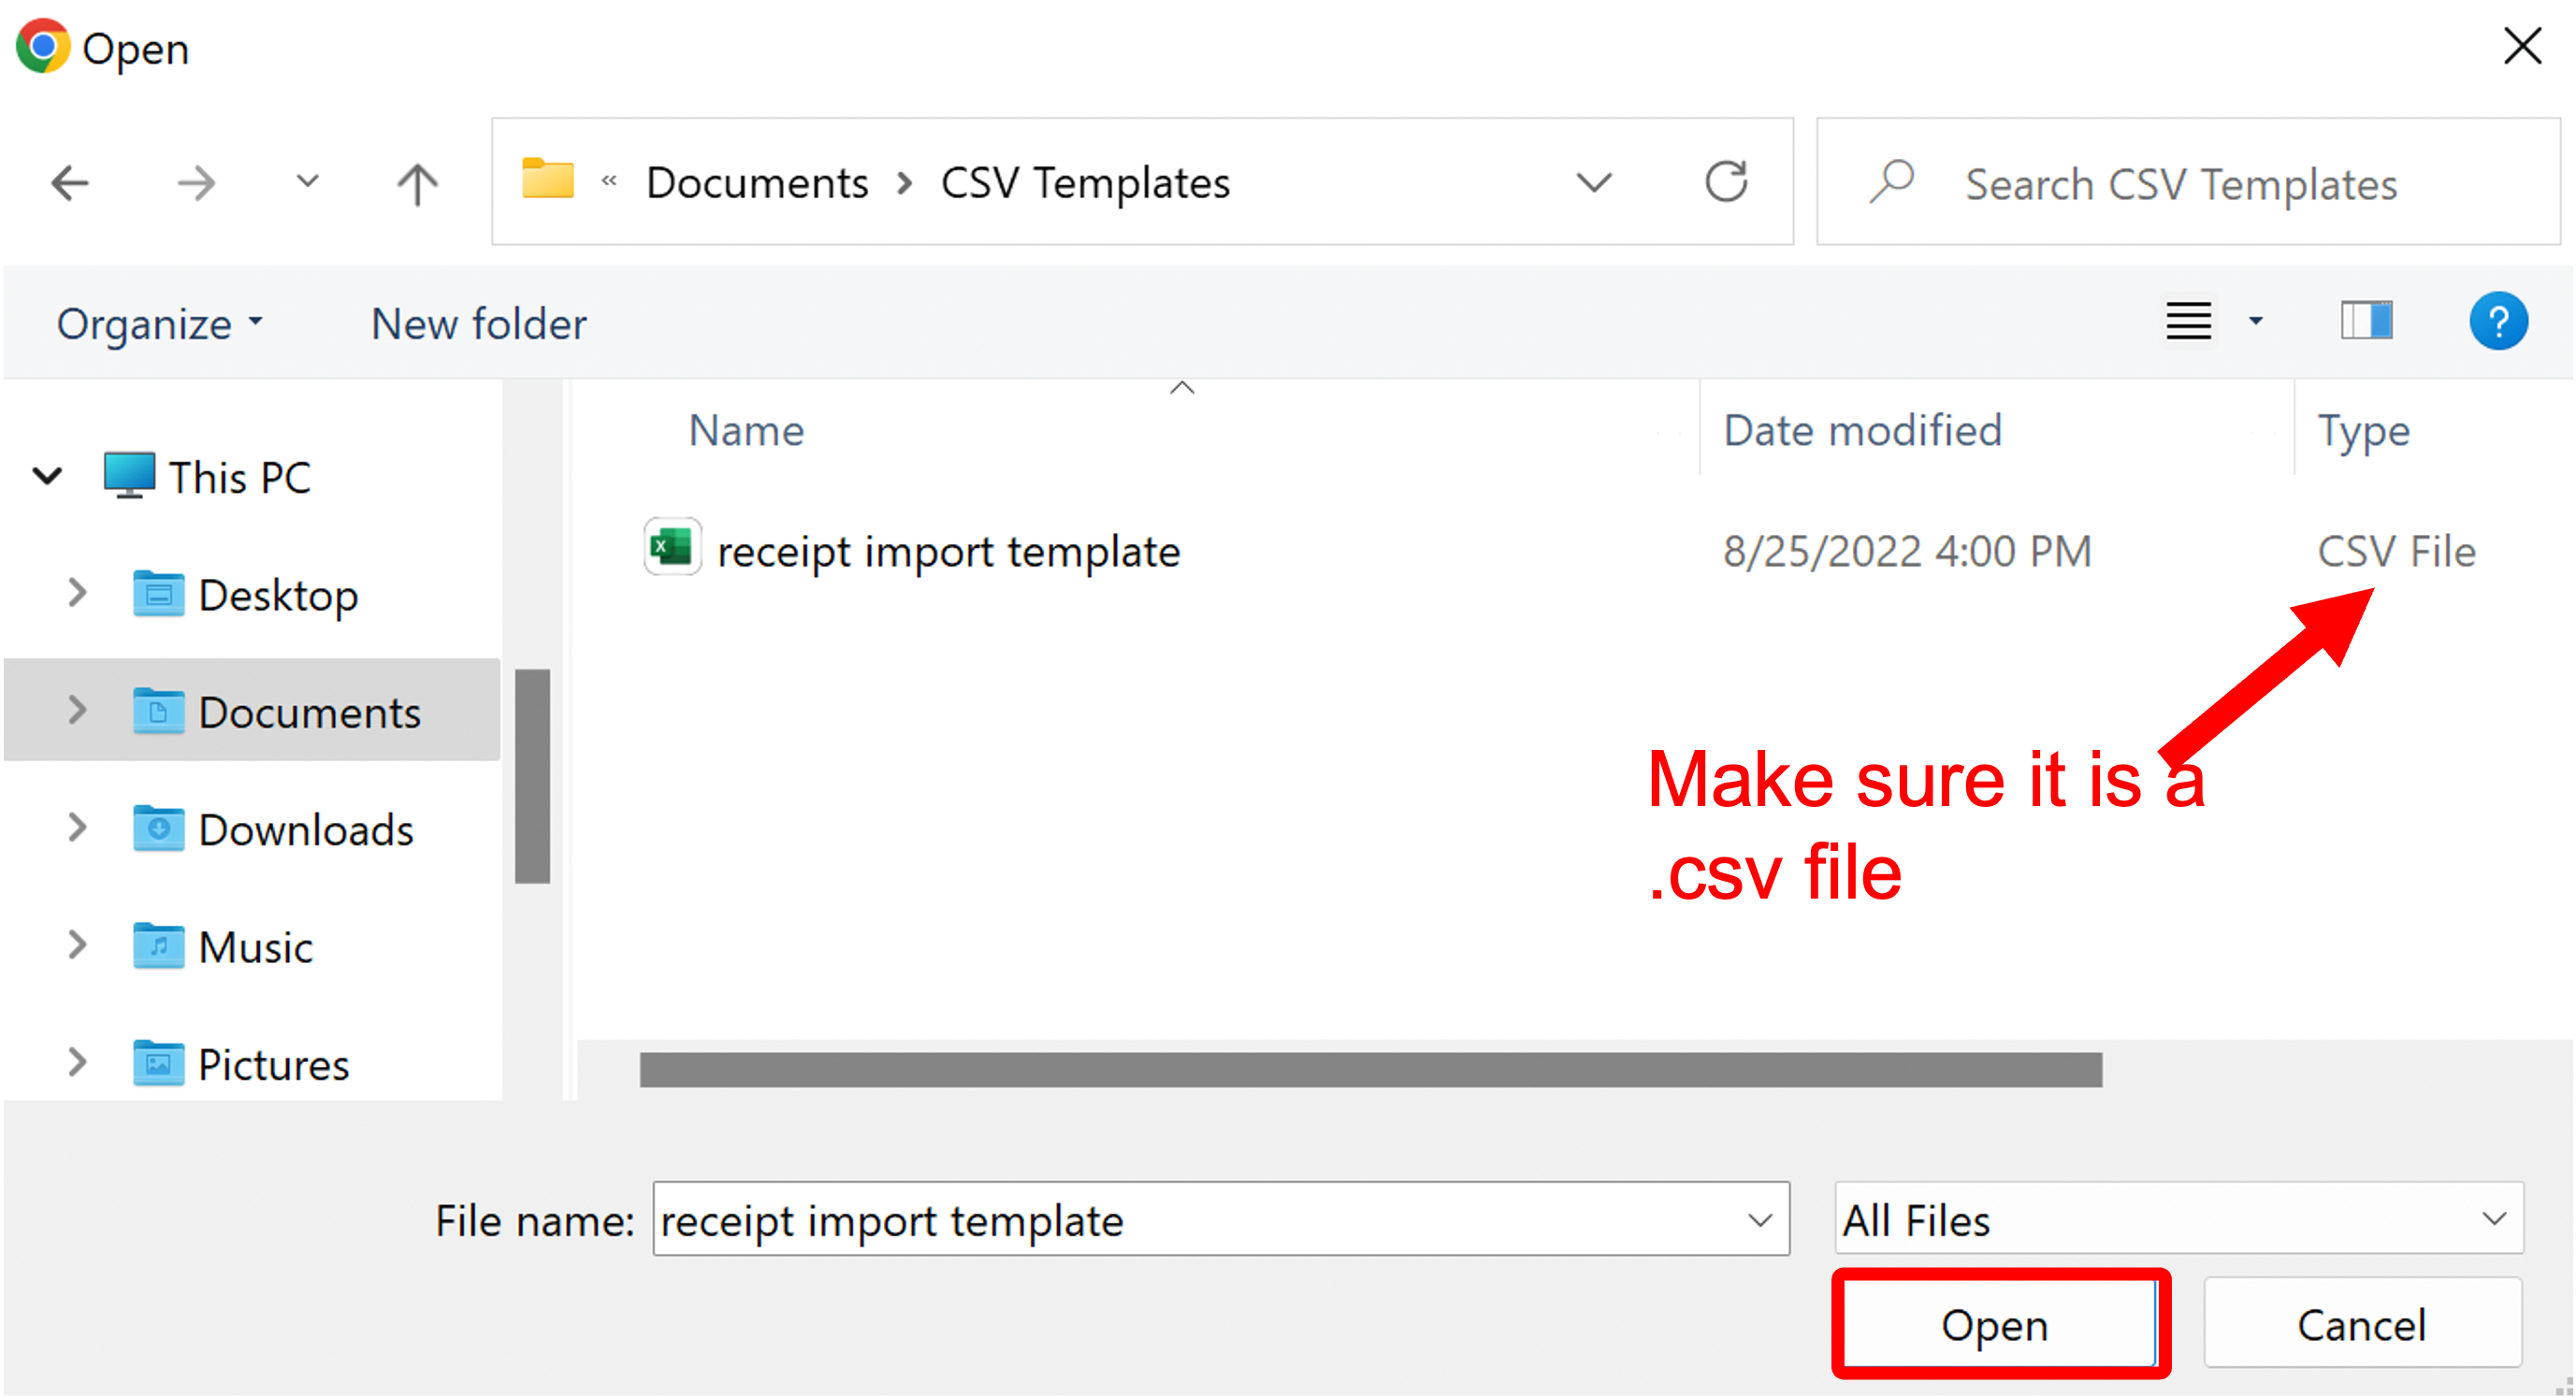
Choosing File
Choose your .csv file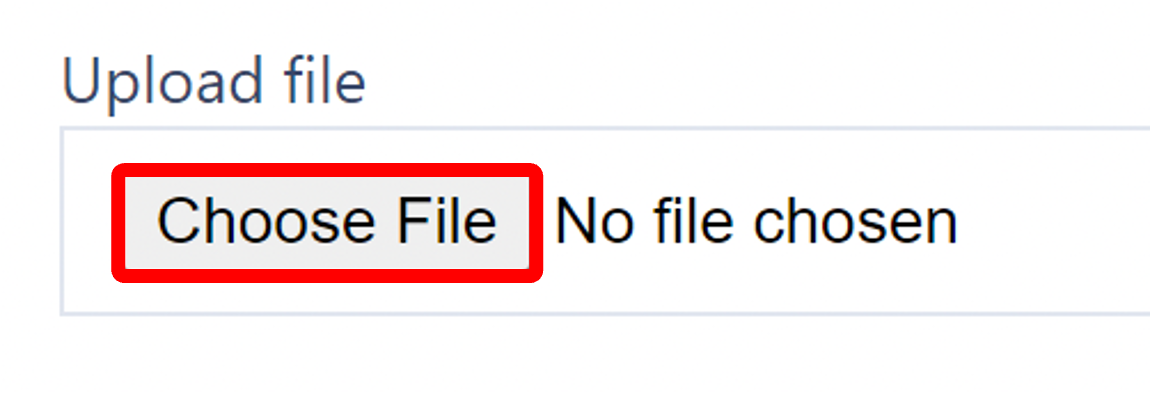
This will now prompt File Explorer or Finder, simply locate your file and click "Open"
Input the Remaining data
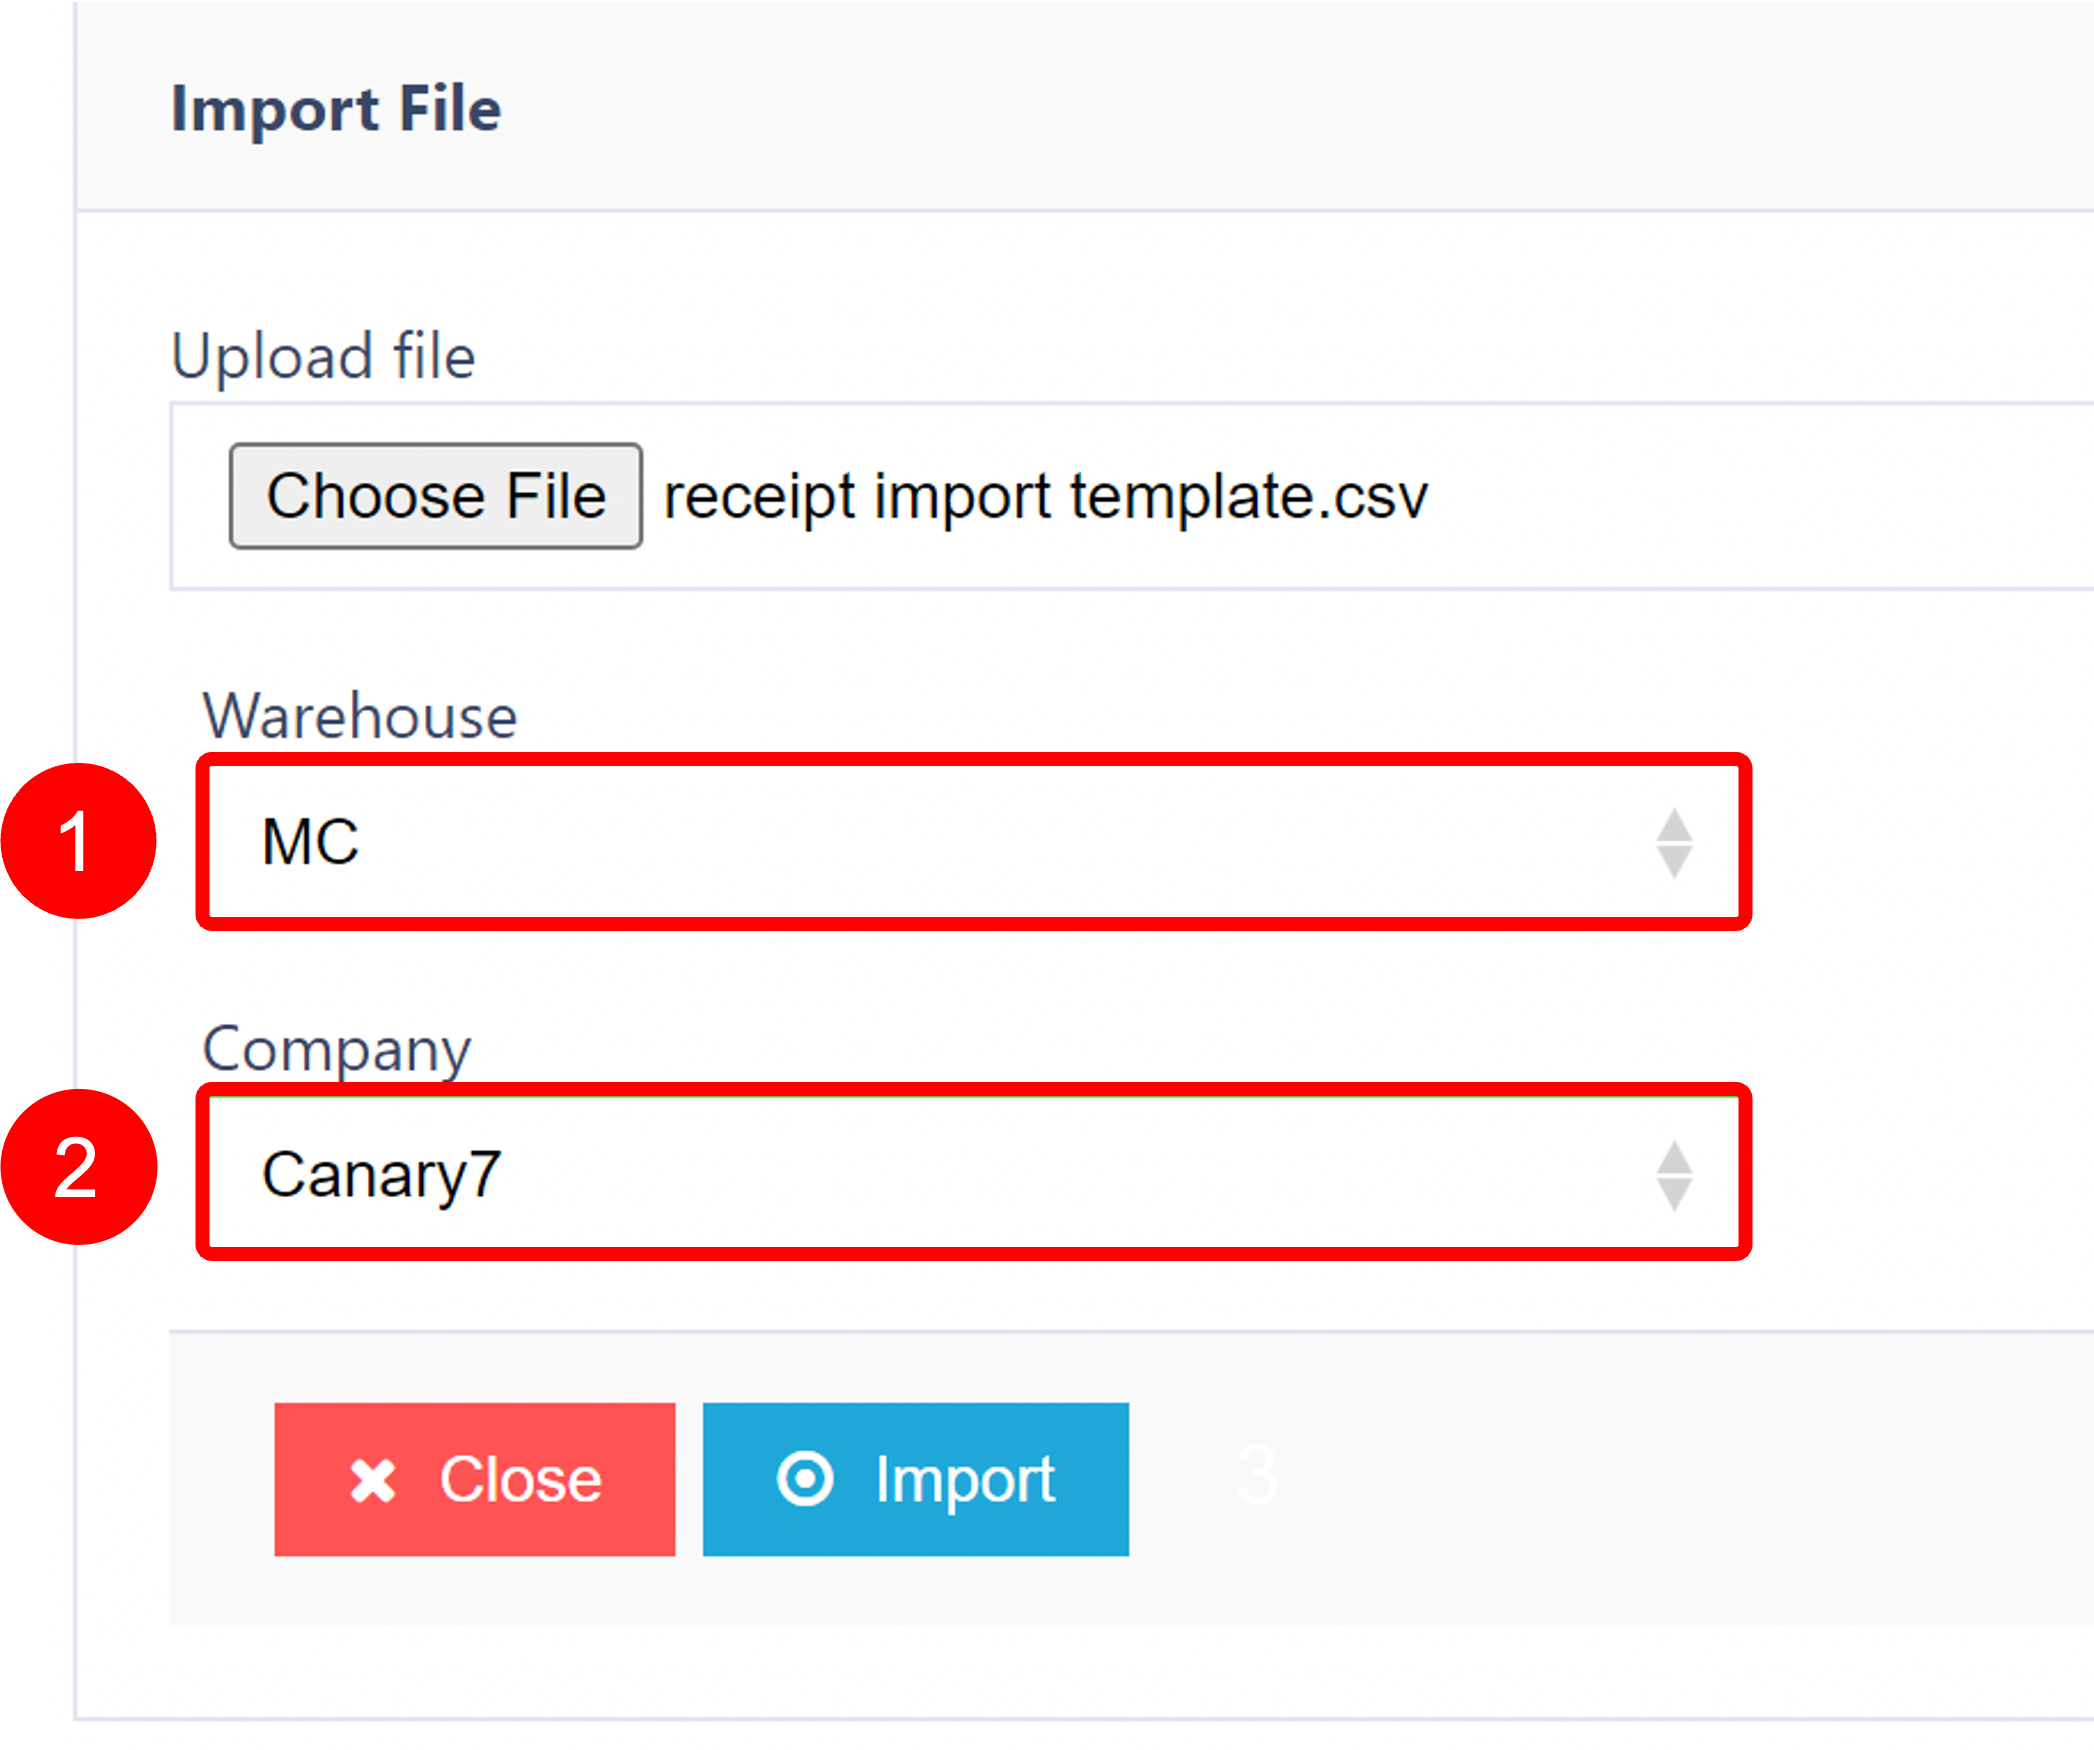
Select the Warehouse
Select the Company
Once satisfied, click on the Submit button to upload your receipts.
📝 Method 2: Manual Entry
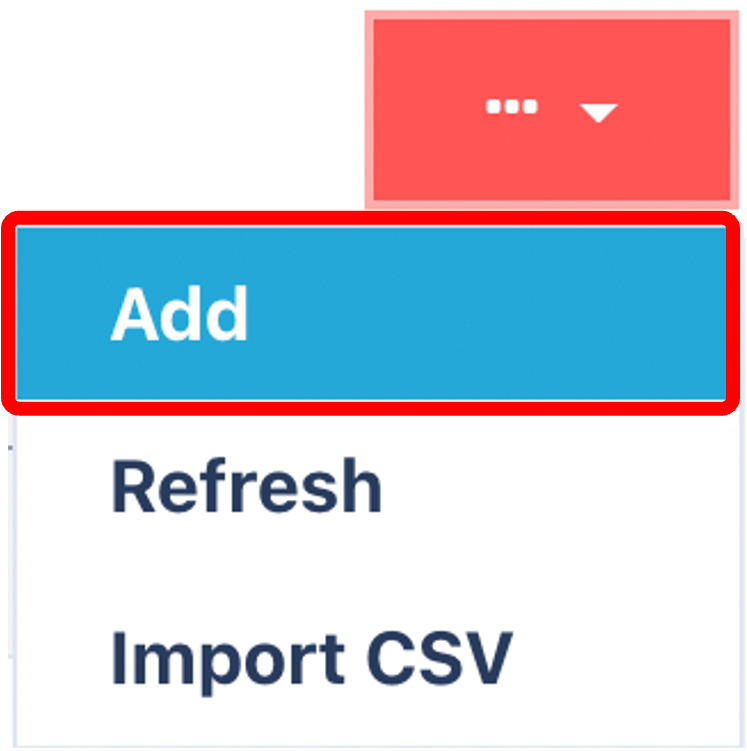
Click on the Red Action Button, this will bring up a drop-down menu, and select "Add"
Input Mandatory Fields
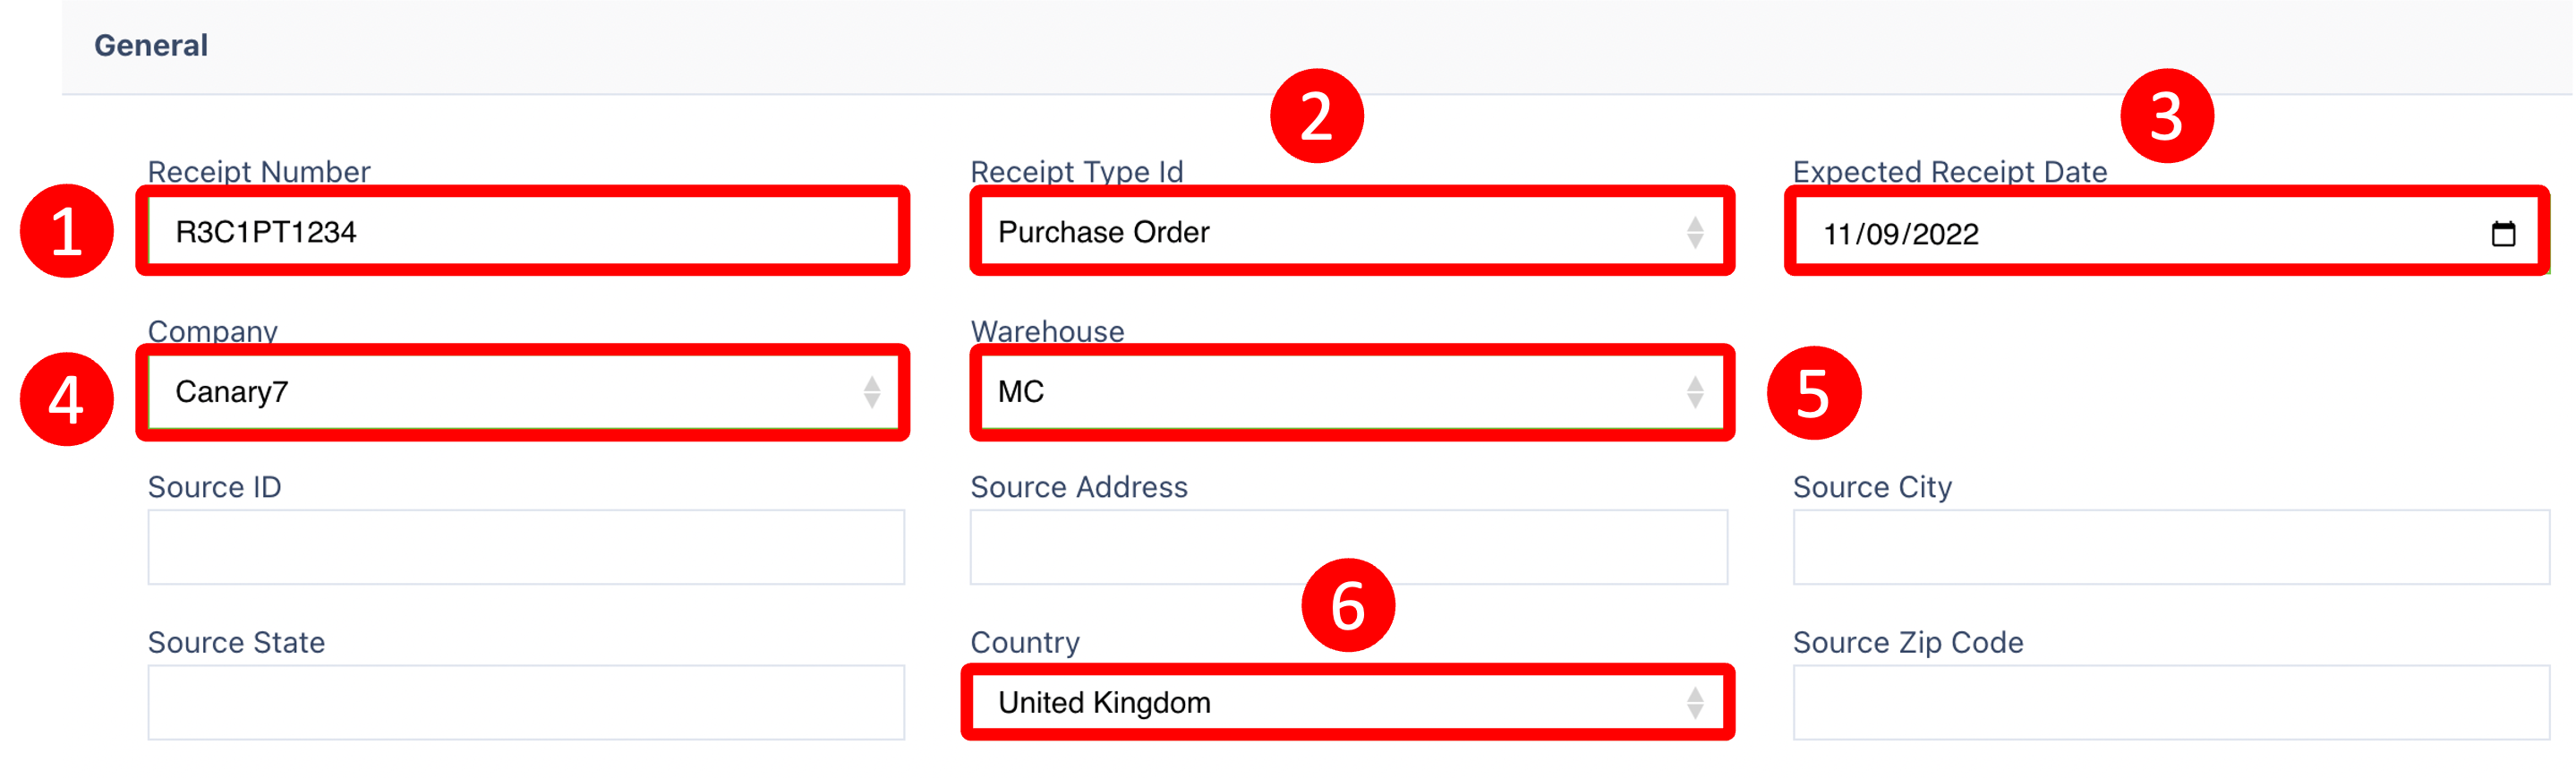
Enter Mandatory Fields:
Receipt Number
Receipt Type ID
Expected Receipt Date
Company
Warehouse
Country
Once you are satisfied now, click the add items button  to continue.
Adding items to the Receipt
With the receipt now created, it will prompt you to add the item to this receipt within the items tab click on the red action button and select "add".

Input Mandatory Item fields
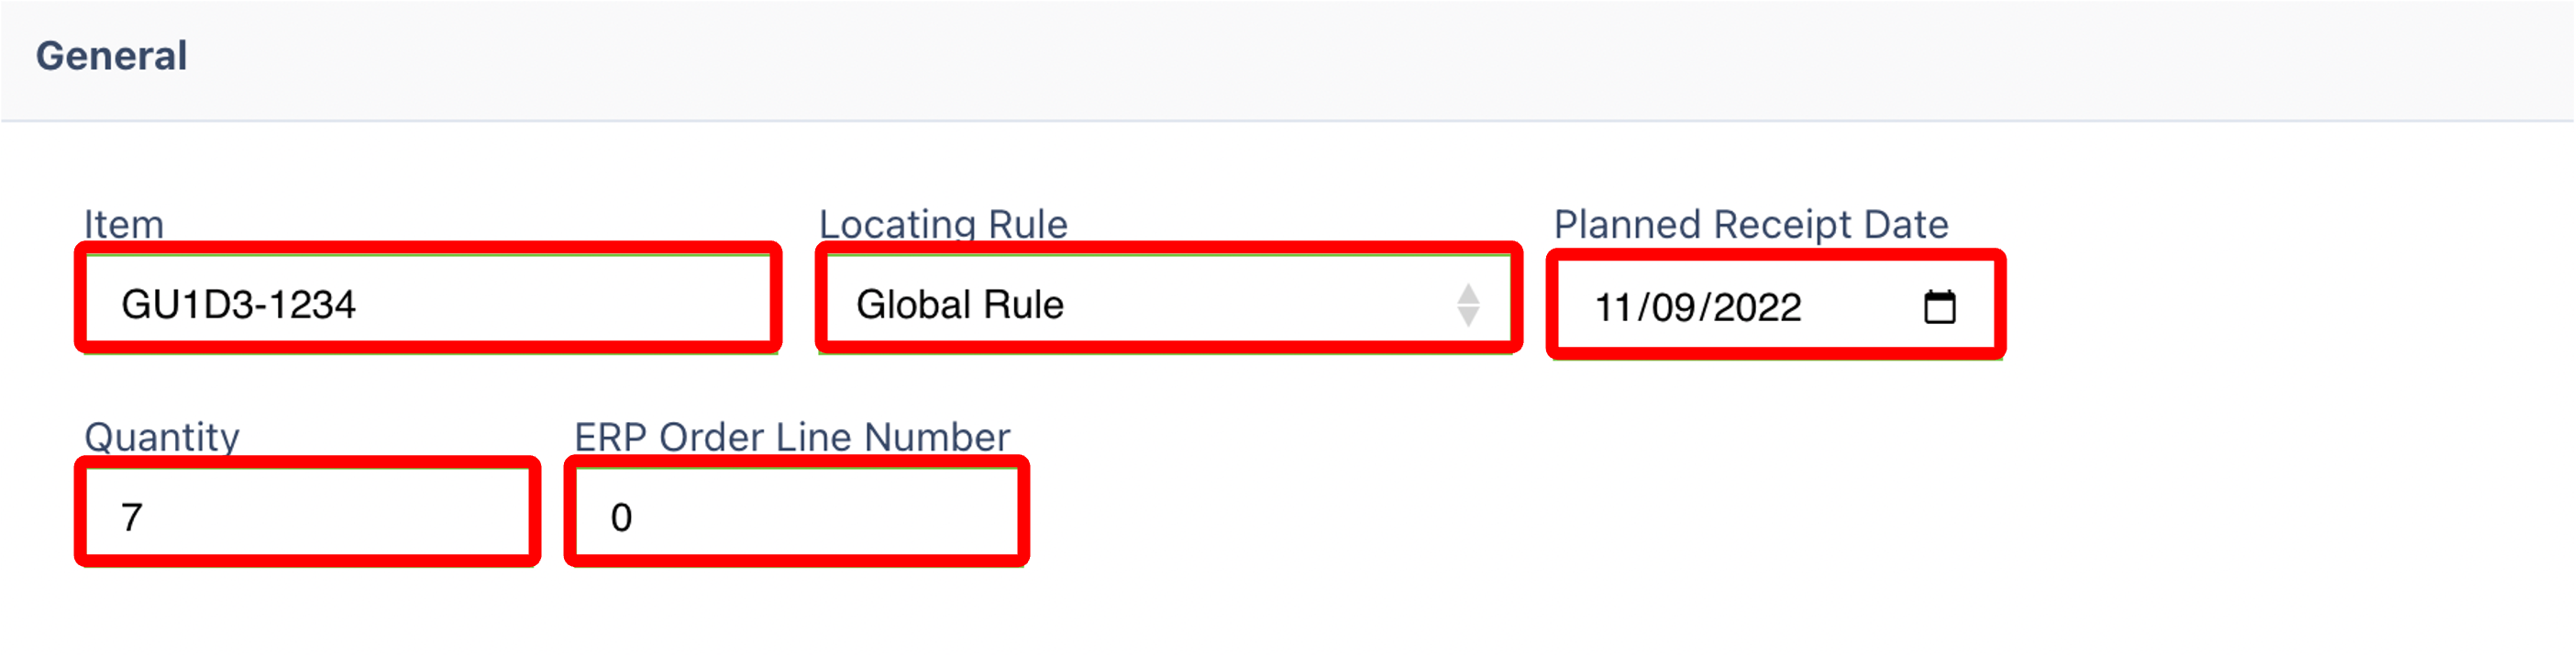
Enter or Select the fields shown, and once satisfied, click the apply button  to attach the item to the receipt.
Your receipt is now completed; all the data you have entered for a receipt can be edited in the future.
Once you have selected and entered the required fields, click on the submit button to add.